
Open your admin and go to Settings → Checkout → Configurations → Edit. That's the real answer in 2026. If a guide told you to paste code into Additional Scripts, close it — that box has been locked since August 2025, and non-Plus stores get switched over by 26 August 2026 whether they're ready or not.
Settings → Checkout → Configurations → Edit. That opens the checkout and accounts editor. Click the page selector menu at the top, choose Thank you, then add app blocks under Sections. Three things almost every other guide leaves out: the one-click upsell isn't in that editor (it's a separate setting, and only one app can hold it), the order status page is a different page that needs its own blocks, and wallet and installment orders — Apple Pay, Google Pay, Klarna and the like — never see a post-purchase offer, which is why so many merchants think their app is broken. Regular Shop Pay is fine — it charges a saved credit card, so offers still show.
Here's something worth knowing before you follow any tutorial on this.
In August 2026 we read through the guides ranking on page one of Google for this exact question. Several of them — including one with "2026 Guide" in the title — still tell you to paste code into Settings → Checkout → Additional Scripts.
You can't. That box went read-only on 28 August 2025.
Not one of the top guides we checked mentioned:
So if you've been following a tutorial and nothing worked — it probably wasn't you. Everything below was checked against Shopify's own Help Center in August 2026. For Shop Pay skipping the cart, Markets shipping bars, and refunding a one-click add-on, see the 2026 cart upsells operator guide.
Shopify rebuilt how these pages work. Code came out. Drag-and-drop blocks went in.
This isn't optional, and it isn't far away.
Plus stores: deadline was 28 August 2025. Already passed.
Every other plan: 26 August 2026. That deadline is almost here.
You might not pick the day. Automatic upgrades began in January 2026. Pause and Build plan stores are upgraded automatically too.
And here's the painful part. Shopify's upgrade guide says it plainly: when you upgrade, your existing Thank you and Order status pages "and any existing customizations on those pages are replaced with the new versions." Gone. Read Shopify's upgrade guide →
Now the good news, and it's real: this makes your life easier.
Old scripts broke on updates. They slowed pages down. Usually one freelancer understood them, and they left two years ago.
Blocks don't do any of that. And you'll never need a developer to change a line of text again.
A merchant installs an upsell app on Monday. Sets up a great offer. Tests it on a friend's order — works perfectly.
Two weeks later: almost zero offers shown. The app dashboard says it's live. Support says it's configured right.
So what happened?
Most of their customers tap the Apple Pay or Google Pay button. Shopify doesn't serve post-purchase offers on wallet payments. The setup was perfect. The traffic just never qualified.
Nobody tells you this before you buy. That's the section further down that most guides skip — and it's the one that saves you the most time.
Most "my block isn't showing" problems are really "I edited the wrong page." Three screens. Three different settings.
Loads the instant payment clears — before the confirmation screen. This is where the one-click upsell appears.
Set in: Settings → Checkout → Post-purchase page
The "Order confirmed!" screen. Seen once, right after paying. Surveys, referral nudges and custom messages go here.
Set in: the editor → page selector → Thank you
Where they come back days later to check tracking. With new customer accounts it works like an account page. Blocks do not carry over from the thank you page.
Set in: the editor → page selector → Order status
In conversation, everyone calls all three "the thank you page." That's fine over coffee. It's not fine in the admin, where each one has its own place to click.
Want the deeper version of how the one-click offer works? See one-click upsell after checkout.
No code. No developer. About half an hour.
Go to Settings → Checkout. Find the Additional Scripts box.
Greyed out? You're on the new checkout. Everything below applies.
Still editable? You haven't been upgraded yet — but you will be. Do this now, calmly, instead of on the day it breaks.
Same settings page. Scroll to the Configurations section and click Edit on the configuration you want to change.
Not "Customize" — Shopify labels this button Edit. If you're hunting for a Customize button, that's why you can't find it.
The editor opens on Checkout. Click the page selector menu at the top and choose Thank you.
That same menu holds Checkout, Thank you, Order status, Orders, Profile and Sign-in. Six separate pages. Pick carefully.
Open Sections, then click ⊕ Add block in the section you want. Pick a block from an installed app, then click the block to open its settings.
Empty list? You don't have an app installed that offers thank-you-page blocks yet. Install one, then come back — the block shows up on its own.
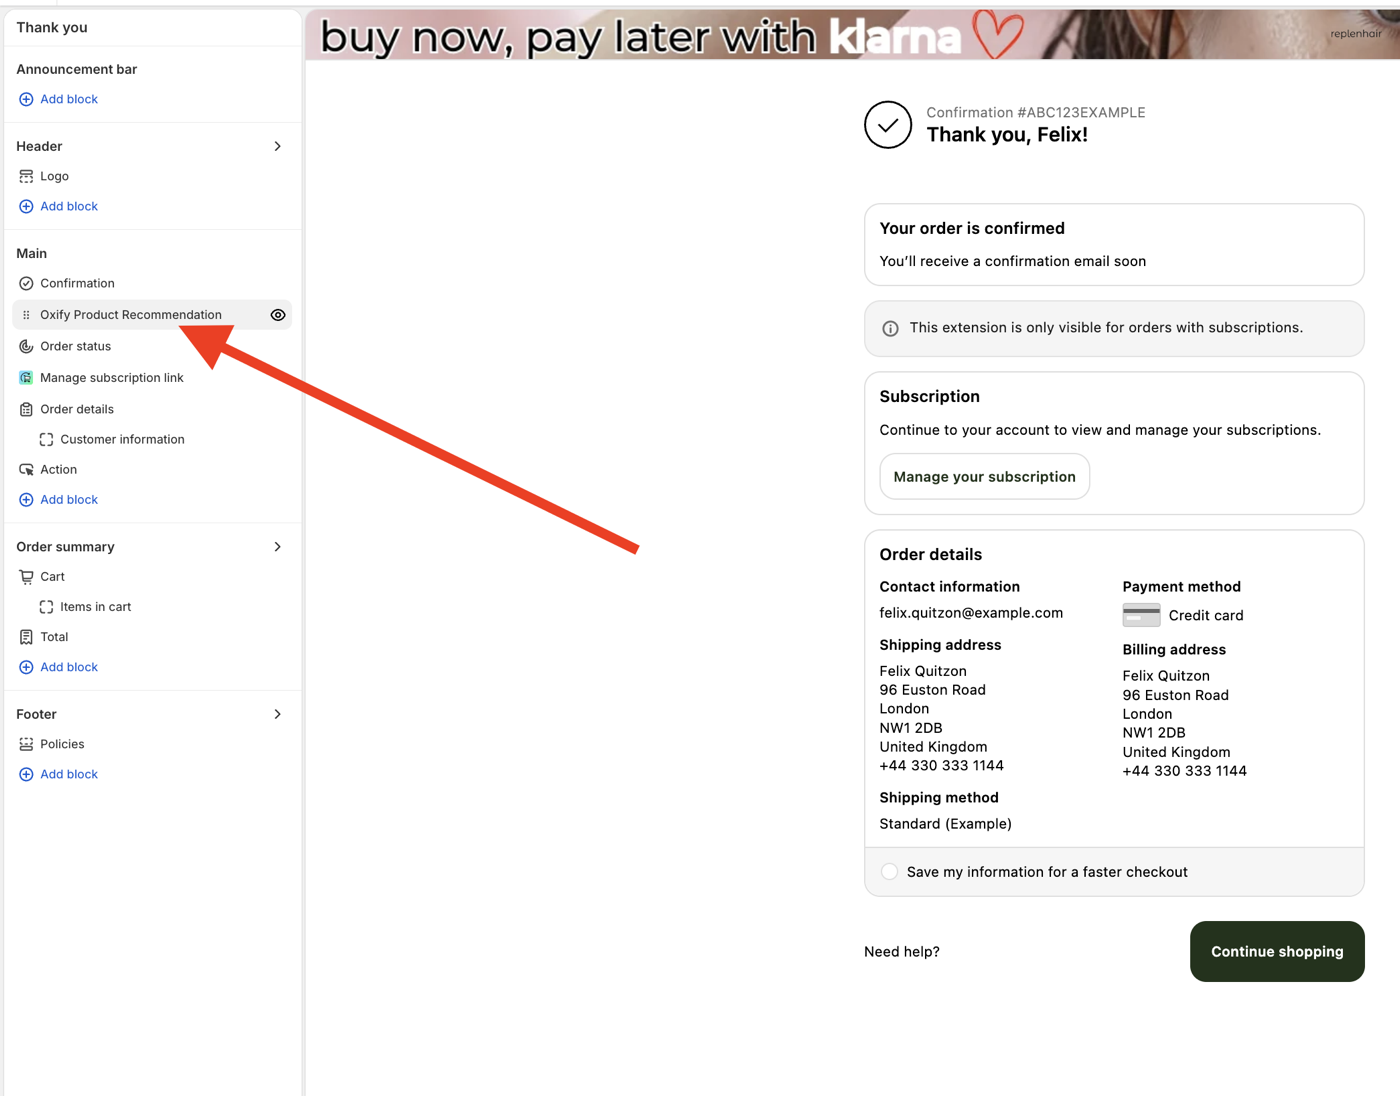
Turn on the preview inspector with ⌘ + ⇧ + | on Mac or Ctrl + Shift + | on Windows.
Now you can reorder, hide and duplicate blocks right in the preview window. Far faster than clicking through the sidebar, and hardly anyone knows it's there.
This is the step people miss. The upsell is not in this editor.
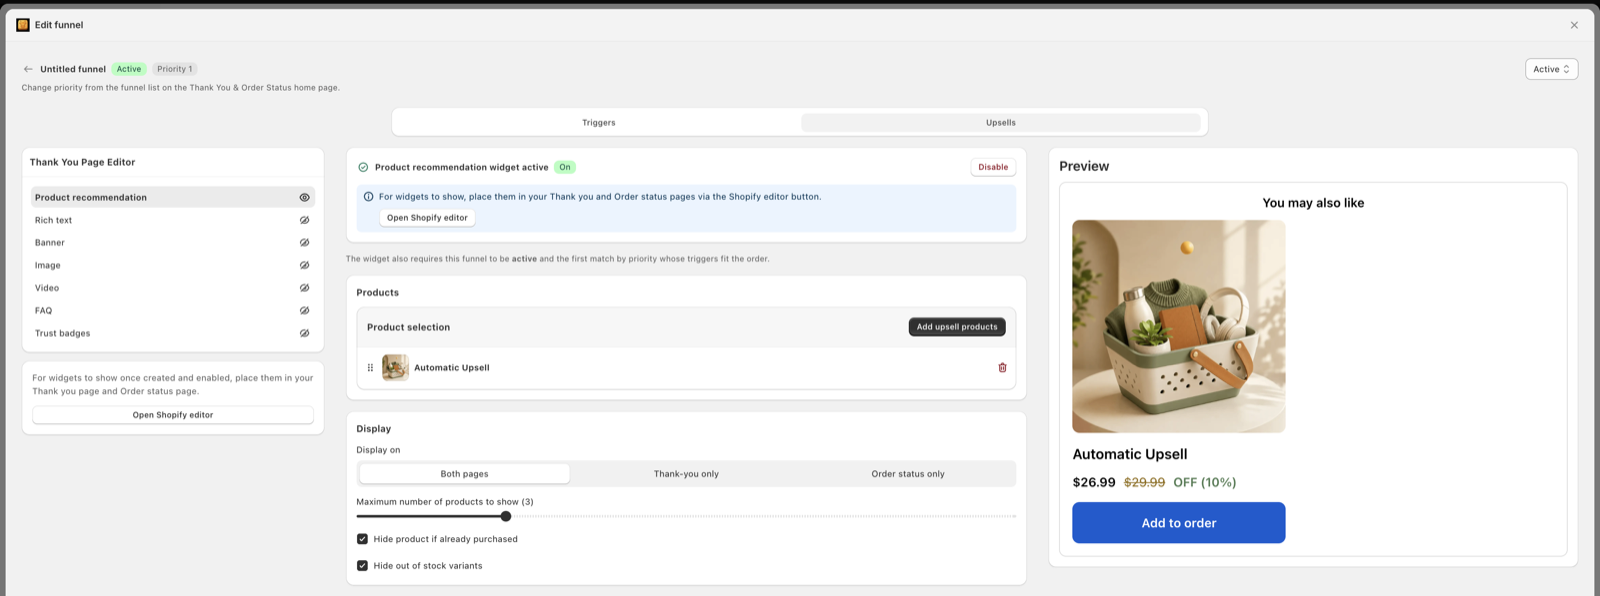
Go back to Settings → Checkout and find Post-purchase page. Choose your app from the dropdown.
Shopify allows only one checkout app to add post-purchase features at a time. Install a second upsell app and nothing changes until you switch this setting over.
Back to the page selector, choose Order status, add your blocks again.
Nothing carries over. Want a tracking block in both places? Add it twice.
Buy something cheap from your own store with a real card, then refund yourself.
Watch the whole flow in order: pay → offer appears → decline → thank you page → blocks load. Check it on your phone, because that's where most buyers are.
Five minutes here catches more problems than an hour of previewing.
You can fill this page with anything. You shouldn't. Every extra block pushes the useful stuff below the fold.
These five earn their place:
Start with the upsell and the note. Add the rest once those work.
Need offer ideas? See the best products to offer as post-purchase upsells.
You set it up. You tested it. Nothing appears.
Before you blame the app, read this list. It's almost always the payment method — and no app can work around it, because it's Shopify's rule, not the app's.
Shopify skips the post-purchase offer when:
None of this is a bug. It's how the post-purchase page works, and it's the same for every app on the App Store.
What to do about it: check your payments report before you judge the app. Work out what share of orders come through plain card payments — that's your real reachable audience. If it's tiny, put your effort into the thank-you-page blocks instead, which show for everyone.
Mostly COD? Read why COD blocks post-purchase upsells and what to do instead.
checkout.liquid. Deprecated on these pages. Theme code doesn't reach them.The trade is worth naming honestly: you lose fine control, and you gain pages that never break on an update and never slow checkout down.
For almost every store, that's a good deal.
The thank you page has no fixed public URL. You cannot type an address and open it. Shopify builds the page once, right after payment, at a link that looks like /checkouts/<token>/thank-you. That token is unique to each checkout, so the link is different for every order.
To see the page, you have two options. Open the checkout and accounts editor (Settings → Checkout → Configurations → Edit), pick Thank you in the page selector, and use the live preview. Or place a real test order and look at the screen you land on.
Looking for the order status page instead? The link is in the order confirmation email — the View your order button goes straight to it.
No. checkout.liquid is deprecated for the thank you and order status pages, and the Additional Scripts box is locked. Theme files cannot reach these pages at all.
The only supported way to change them is with app blocks built on Checkout Extensibility — the drag-and-drop system in the steps above. Some apps, including ours, let you add custom CSS or HTML inside their own block, so there is still room for small styling tweaks. But there is no supported way to open a code file and edit the page directly anymore. If a tutorial shows you Liquid snippets for this page, it was written for the old checkout and will not work.
No. Shopify does not let you redirect the thank you page to your own URL. There is no setting for it, and the old script tricks stopped working when Additional Scripts was locked. Shopify keeps buyers on its own hosted page so order details stay secure.
The good news: the things people want a redirect for are all possible on the page itself. You can customize the blocks, add a one-click offer or a survey with an app, and send tracking data through Customer events (web pixels). If you want buyers on a special page, link to it from a block on the thank you page or from the order confirmation email.
Older store with custom scripts? Work through these in order. It takes an afternoon.
Full disclosure: this is our app. We built it because the usual answer here is installing four separate tools — one for the upsell, one for the blocks, one for gifts, one for the cart. Oxify covers the whole setup in one app, built on Checkout Extensibility, so it's ready for the 2026 upgrade the day you install it.
Comparing options? Read our honest ranking of the best post-purchase upsell apps or see how Oxify stacks up against Zipify OCU. App details verified on the App Store listing, 12 August 2026.
Go to Settings → Checkout in your Shopify admin. In the Configurations section, click Edit on your checkout configuration. That opens the checkout and accounts editor. Use the page selector menu at the top and choose Thank you, then add app blocks under Sections. The one-click upsell is not in this editor — it is set in Settings → Checkout → Post-purchase page.
No, and this is where most guides go wrong. Shopify made the Additional Scripts box view-only on 28 August 2025. You can read what is in it, but you cannot edit it, and on the new checkout it does not run. If a tutorial tells you to paste code there, it was written before the change.
Shopify Plus stores had to move by 28 August 2025. Every non-Plus plan has until 26 August 2026. Automatic upgrades began in January 2026, so your store may be switched over before the deadline without you picking the date.
They are replaced. Shopify's upgrade guide says your existing Thank you and Order status pages, and any customizations on them, are replaced with the new versions. Copy the contents of your Additional Scripts box into a note now, because after the upgrade you cannot get it back.
No. Merchants on Basic and above can add app blocks to the Thank you and Order status pages, and one-click post-purchase offers work on every plan. Plus is only needed to customize the checkout page itself and to run offers inside checkout.
No. They are two separate pages in the page selector menu, with separate blocks. The thank you page is the confirmation screen shown once, right after payment. The order status page is what the buyer returns to later to check tracking. A block added to one does not appear on the other.
Almost always the payment method. Shopify does not show post-purchase offers when the order was paid with a wallet or installment service — Apple Pay, Google Pay, Amazon Pay, PayPal wallet, Klarna, Affirm, Afterpay or Shop Pay Installments. Regular Shop Pay is fine — it charges a saved credit card, so offers still show. Offers are also skipped for orders containing subscription products, gift cards, duties or multiple currencies.
No. Shopify lets only one checkout app add post-purchase features at a time, and you choose it in Settings → Checkout → Post-purchase page. Installing a second upsell app changes nothing until you switch the selection. You can still use blocks from several different apps on the thank you page itself.
No. They load after payment is taken, on Shopify's own hosted pages, so they cannot affect your checkout speed or your checkout conversion rate. Removing merchant scripts from checkout was a big part of why Shopify made this change.
Two limits catch people out. Customizations per market are not supported on the Thank you and Order status pages, so you cannot show a different layout to a different country. You also cannot hide individual items inside a bundle. Beyond that, blocks sit in defined slots and follow your brand settings, so you get order and styling control rather than pixel-level control.
Copy your Additional Scripts into a note. Open the editor. Add one block. That's it — you're ahead of the deadline and ahead of most stores.